Cotherstone Moor Tank Wreck
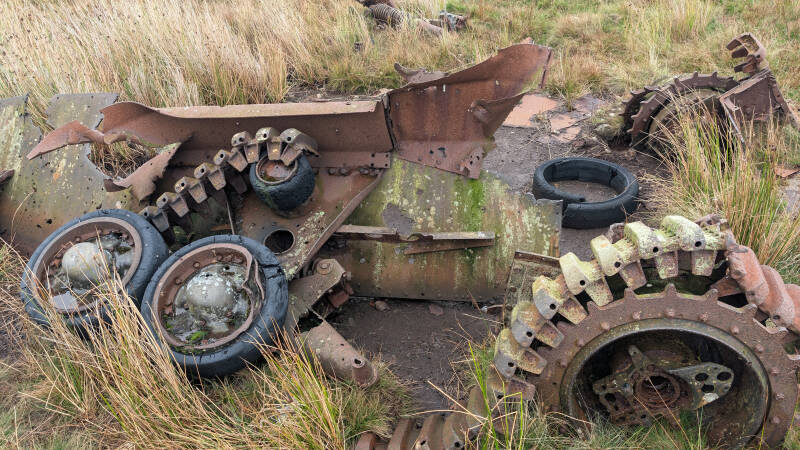
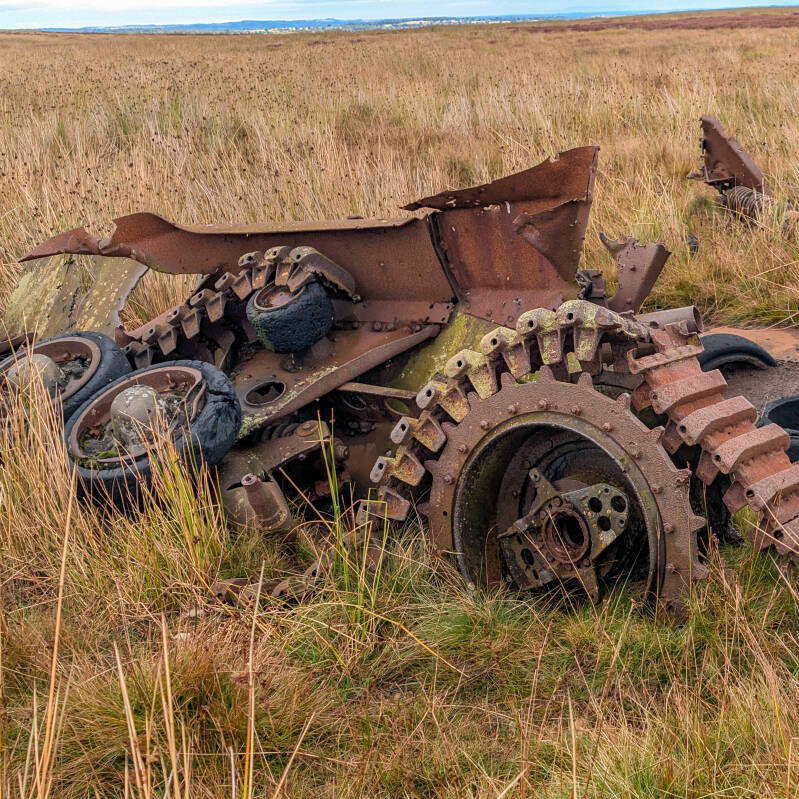
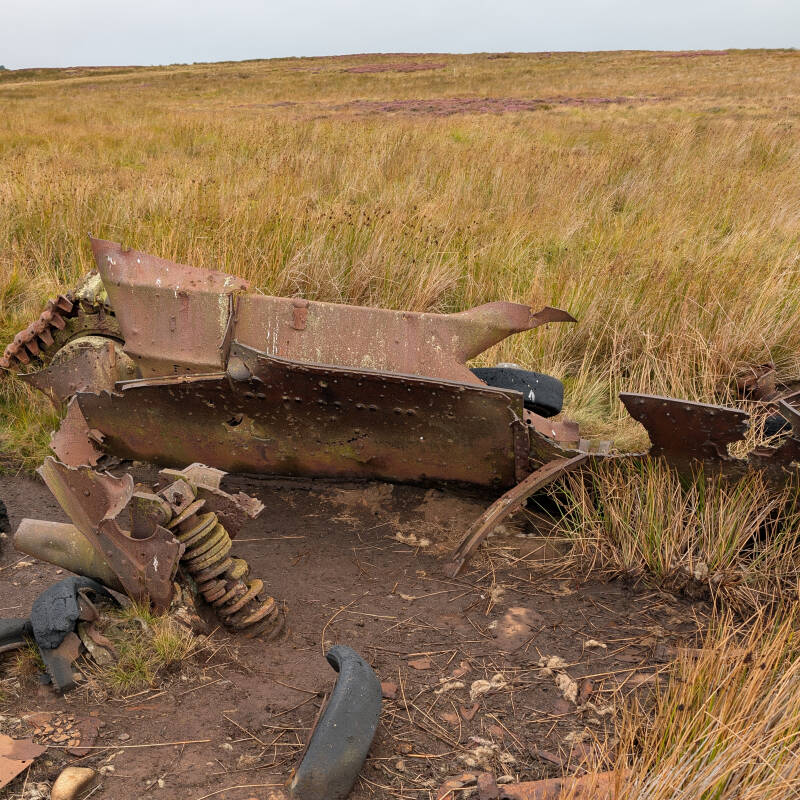
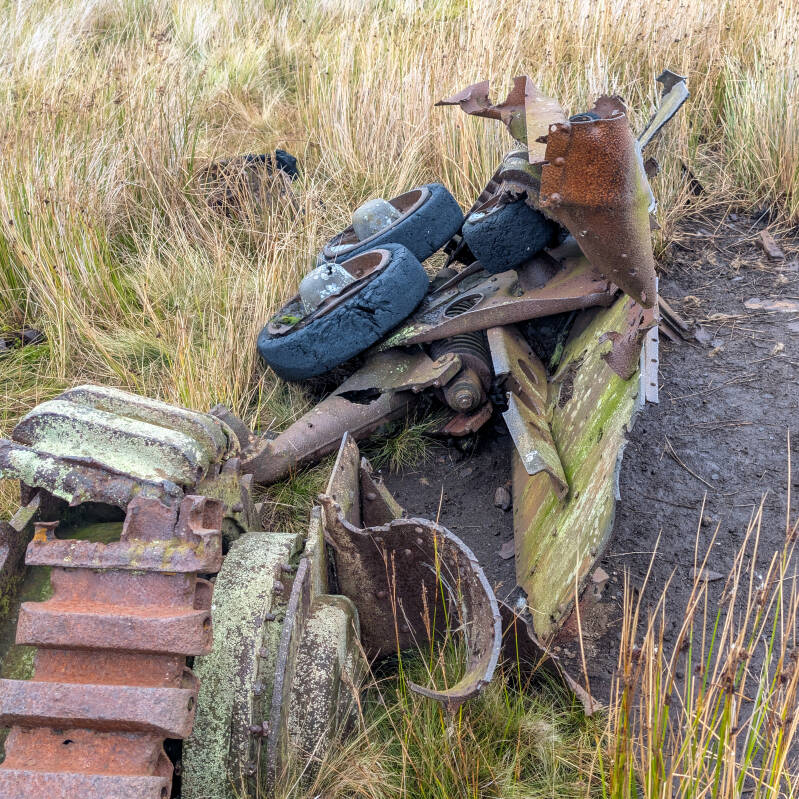
Out on Cotherstone Moor, between Bowes and Cotherstone, the remains of an old Second World War tank still sit out on the open moor near Battle Hill. It has been written about a few times over the years and is often called a Valentine tank, but after going up there ourselves multiple times, getting right in amongst the wreckage, photographing it properly and taking measurements from the wheels, track and armour, we believe it is much more likely to be a Cruiser Tank Mk I, better known as an A9.
What makes this place even more interesting is that the tank is only one part of a much bigger military story. Battle Hill is still used as an MOD training area today, while a little further south was the old RAF Bowes Moor storage depot, used during the Second World War for huge quantities of ammunition and chemical weapons. Then, during the Cold War, a Royal Observer Corps underground monitoring post was built nearby to watch for nuclear attack and radioactive fallout. On this page we’ve pulled all of that together with what we found at the tank, what we believe it actually is, why it ended up here and the short walk across the moor to see the wreck for yourself.
* marks affiliate links. If you buy or sign up, we earn commission at no extra cost to you.
It helps cover website costs and keeps our guides free.
Quick Facts
Distance: 2.2 miles circular
Time: Around 1 hour, but allow longer to explore the tank wreck
Start and finish: Gravel pull-in on Moor Road between Bowes and Cotherstone
Postcode: DL12 9DL (general area only – use the route map for the exact start point)
Tank wreck coordinates: 54.556513, -2.025072
Route type: Short circular walk, with a there-and-back option
Terrain: Grass track, gravel track and open moorland
Difficulty: Moderate
Dogs: Keep on a short lead, especially during ground-nesting bird season
Navigation: Essential across the open moorland
OS Map: Explorer OL31 North Pennines*
Digital route: View the route*
GPX files: Free download here

Parking and Access
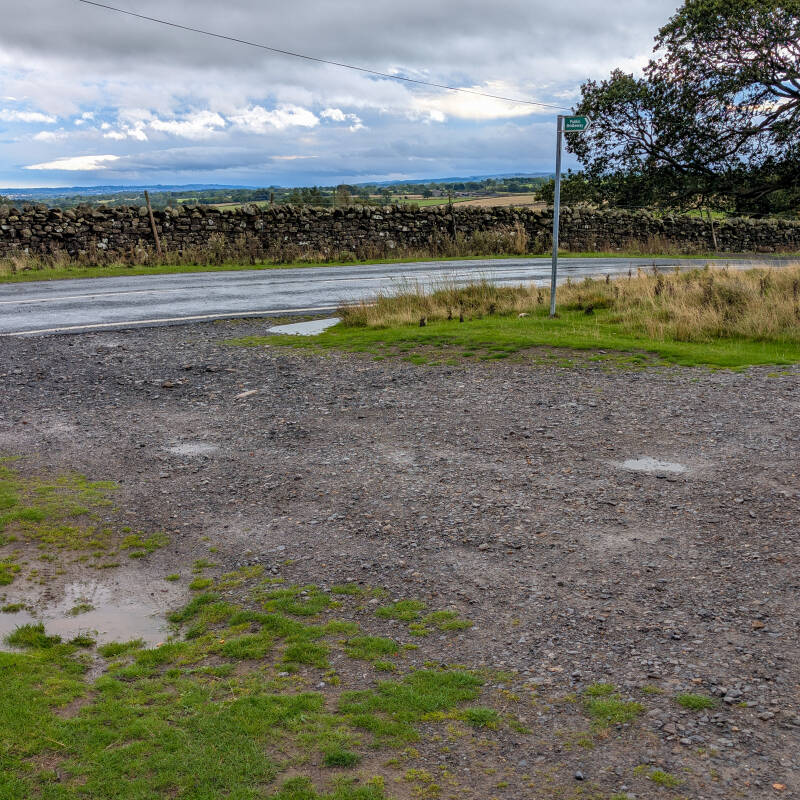
There is no formal car park for this walk. We used a small gravel pull-in on Moor Road between Bowes and Cotherstone, just beyond the Battle Hill training area if you are coming from Bowes.
Parking coordinates: 54.554587, -2.006746
Cotherstone Moor is open access land, but this is still rough upland ground rather than a surfaced walking route. The walk includes grass tracks, gravel track and open moorland, with boggy patches, uneven ground and hidden gullies in places, so good footwear and sensible navigation are important.
Battle Hill sits right beside the route and is still an active MOD training area. If red flags are flying or red lights are showing, do not cross the range boundary and follow all warning signs and instructions on the ground.
Dogs should be kept under close control and on a lead during the ground-nesting bird season.
Walk to the Cotherstone Moor Tank Wreck
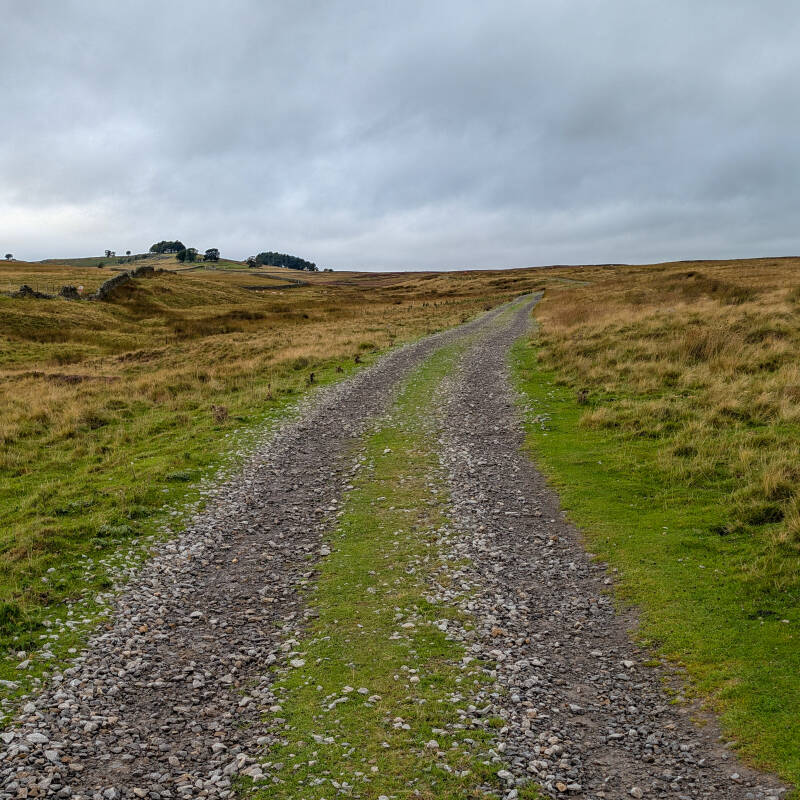
From the gravel pull-in on Moor Road, follow the grass track straight out onto the moor. After around five minutes it joins a wider gravel track. Keep following this track across Cotherstone Moor.
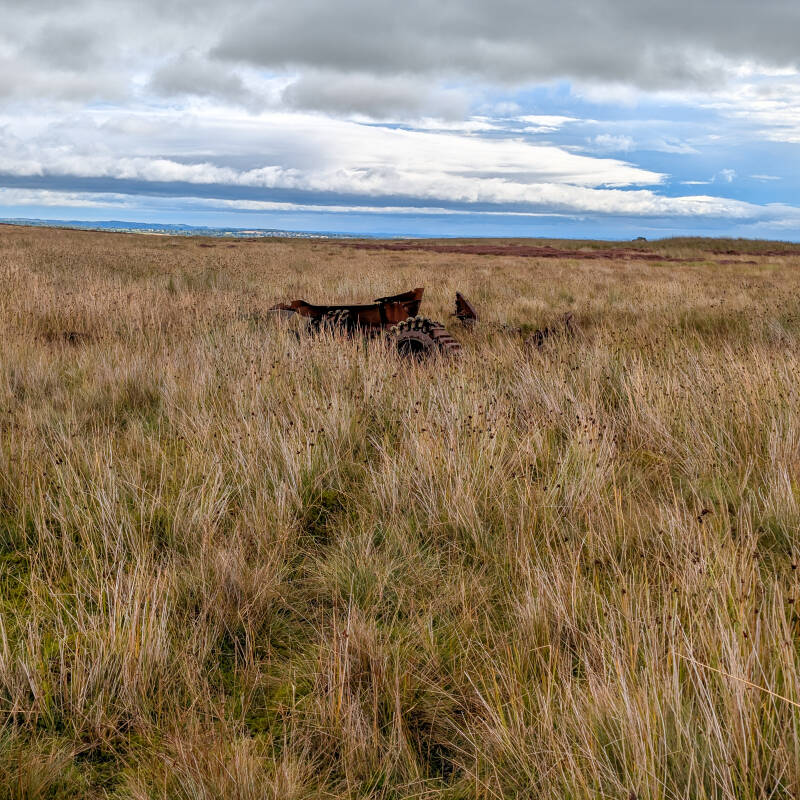
The turn towards the tank is not marked and there is no obvious junction or path to look for. At the point shown on our route map, leave the gravel track and turn right across the open moorland, heading roughly in the direction of Lamb Hill. From here, having the route loaded on a hiking app or GPS, or using an OS map and compass, is important as the route across the moor can be difficult to pick out.
If you stayed on the gravel track instead of turning off, it would eventually take you towards the abandoned East Loups farmhouse.
Continue across the open moorland using the route map for your bearings. There are no clear waymarkers and some of the paths can fade out completely. You will turn right again further across the moor, then make another right to drop down towards the tank wreck.
The tank sits out on the open moor, so do not rely on being able to spot it from a distance. The ground can be boggy, uneven and cut by hidden gullies, so take your time and keep checking your position.
After visiting the tank, you can either return the way you came or continue across the moor to complete the short circular back towards Moor Road and the gravel pull-in.
The circular return is again across open moorland rather than an obvious marked path, so good navigation is essential. Keep well clear of the nearby Battle Hill military training area and never pass through military gates or enter restricted ground when red flags are flying.
What Tank Is the Cotherstone Moor Wreck?
The tank has been described online for years as a Valentine, but the more time we have spent with the wreck, the less convinced we have become by that identification.
We have been back to the site several times, photographing what remains and measuring as much of the wreck as we reasonably could. We measured the track, road wheels, sprocket, surviving hull and the thickness of one of the main side plates, then started comparing those measurements with old drawings, photographs and published specifications for British tanks of the period.
From everything still lying on the moor, we believe this is the remains of a Cruiser Tank Mk I, better known as the A9.
We are not saying that as absolute fact. So much of the original tank has disappeared that there is no surviving turret, engine or obvious identification plate to simply give us the answer. We could still be wrong, and if somebody has photographs, documents or information that points us in another direction, we would genuinely love to hear from them.
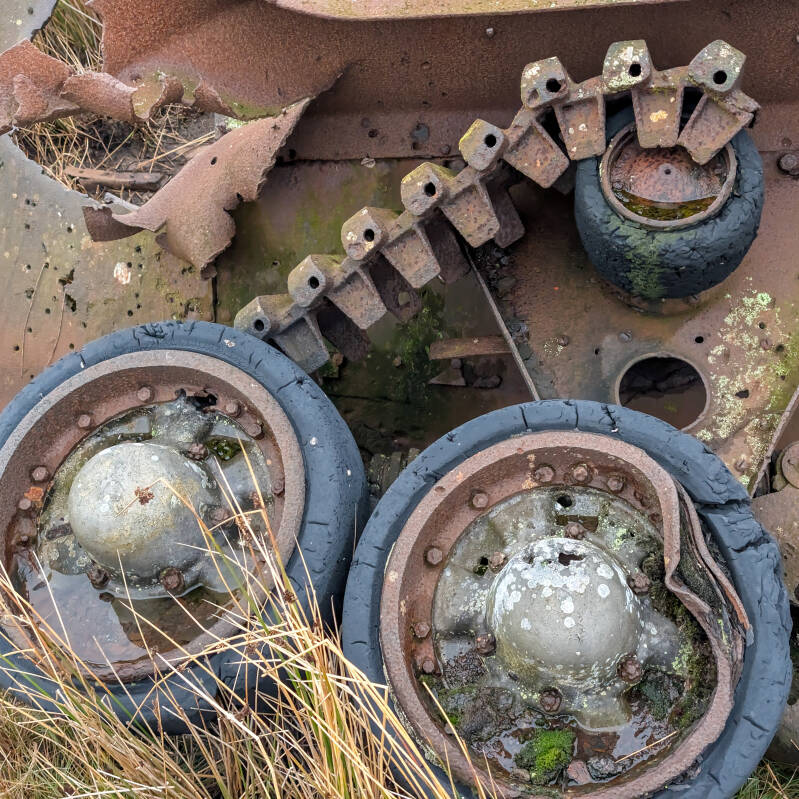
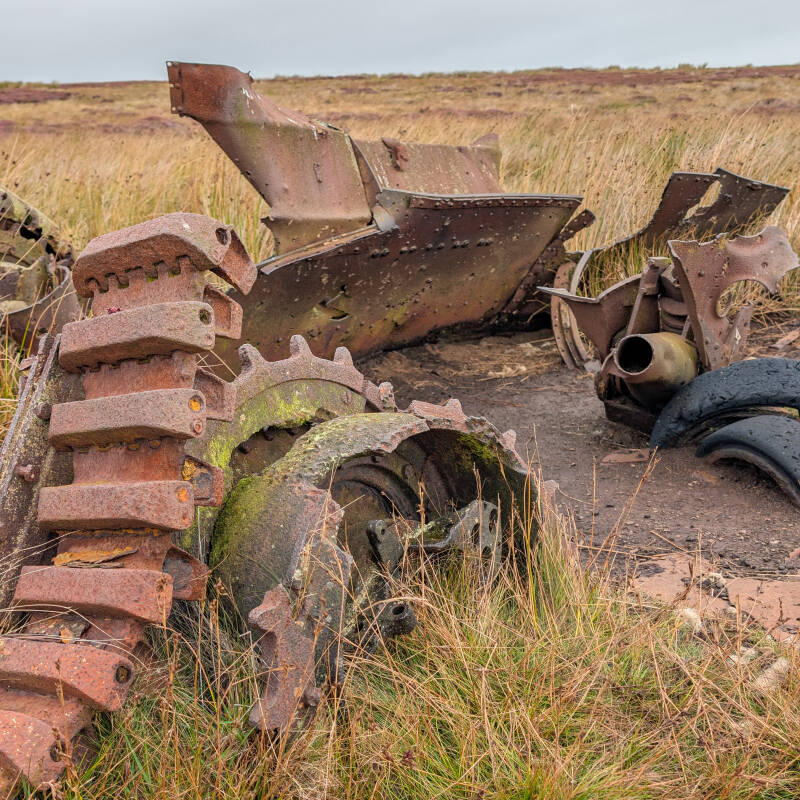
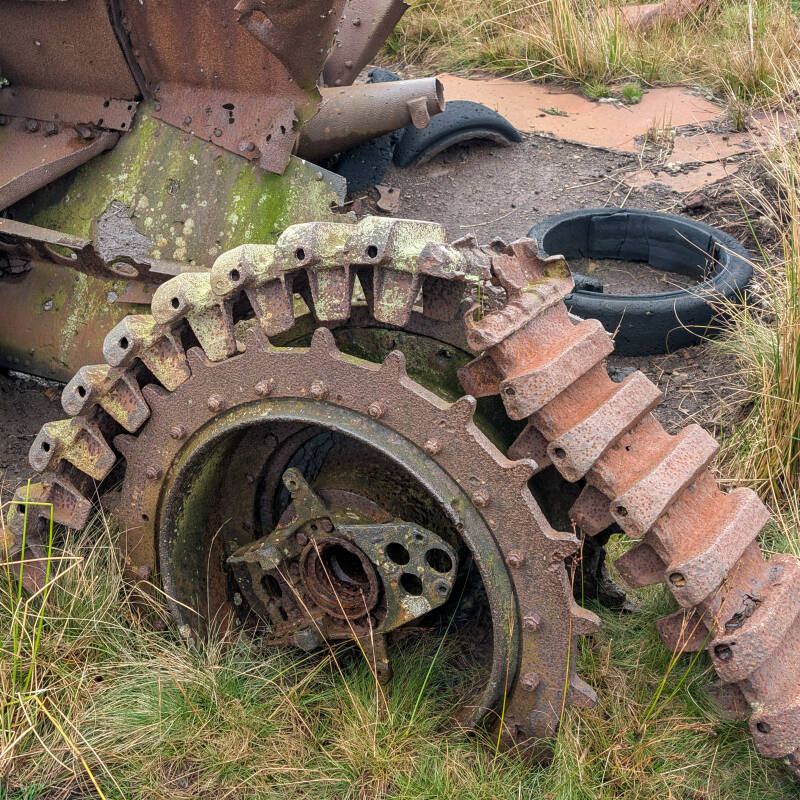
What makes the A9 identification interesting is how well the surviving parts fit. We measured the track at around 355 mm wide, almost exactly 14 inches, which is the published track width for an A9. The surviving side armour we measured was approximately 10 mm thick, which also matches the published thickness of the A9 hull sides. The arrangement of the wheels, bogies and large springs fits the A9's distinctive triple-wheel suspension too. Published specifications give the A9 armour as only 6–14 mm thick, with 10 mm hull sides.
There is another clue too. When this exact Cotherstone Moor wreck was discussed by historic military vehicle enthusiasts in 2021, more than one person identified it as an A9, including one who said he had seen the wreck himself. The old “Valentine Mk III” description also appears to have come from the newspaper rather than the original researcher.
The confusion with the Valentine actually makes sense. The later Valentine used a suspension design closely related to the A9, so when most of the upper tank has disappeared the remains can look remarkably similar. The Tank Museum confirms that only 125 A9 Cruisers were built, and that the type carried a maximum of just 14 mm of armour.
What We Measured
Track width: approximately 355 mm
Small road wheel: approximately 500 mm
Large road wheel: approximately 619 mm
Large toothed wheel/sprocket: approximately 760 mm
Surviving side plate: approximately 10 mm thick
Side plate height: approximately 940 mm
Surviving wreck length: approximately 3.2 m
Surviving wreck width: approximately 2.2 m
We also measured and photographed a number of other surviving parts, including smaller fittings and sections of the running gear, but there are too many individual pieces to list here.
These are our own measurements taken from what survives on Cotherstone Moor. They are approximate because the wreck is damaged, twisted and partly buried, but taken together they are why we currently believe the tank is an A9 Cruiser Mk I rather than a Valentine.
Please Leave the Wreck as You Find It
The remains have survived out on the moor for decades. If you visit, please do not move pieces around, dig around the wreck or take anything away. Apart from preserving the site for the next person, where individual pieces are lying can itself be useful when trying to understand what survives.
Why Is There a Tank on Cotherstone Moor?
Finding the remains of a tank lying out in the heather seems a bit strange at first, but once you start looking into the military history around Cotherstone Moor, Battle Hill and Bowes, it begins to make a lot more sense.
Battle Hill has a proper military paper trail. In November 1947 the Air Ministry told Parliament that the RAF Regiment was moving from Spaunton Moor to Battle Hill near Barnard Castle, where it would train in future. Just four months later, Parliament was discussing separate areas at Battle Hill being used by both the Army and RAF Regiment, specifically mentioning infantry training and the small arms range.
The training was not limited to rifles either. In April 1954 one soldier was killed and six others injured in an explosion at Battle Hill. The War Office later confirmed that the accident happened while soldiers were collecting expended rockets from Battle Hill Range. That gives us firm evidence that rockets were being fired here by the early 1950s.
Battle Hill is still an active military training area today. The Ministry of Defence describes it as being used for rifle and machine gun training, including night firing, as well as battle simulation and pyrotechnics. Battle Hill also still appears on the MOD's current firing schedules.
There was military activity all around this part of Teesdale too. At Barnard Castle, the 125th Infantry Brigade was converted into the 10th Armoured Brigade in November 1941, with three Lancashire Fusilier battalions becoming Royal Armoured Corps regiments. That tells us tanks and armoured training were very much part of the wider wartime landscape, although we have found nothing proving that this tank belonged to one of those particular units.
A little further south was RAF Bowes Moor, which was a completely separate military site but adds another extraordinary layer to the story. No. 81 Maintenance Unit was established there in December 1941 as an ammunition depot, and official MOD records confirm that Bowes Moor was used to store mustard gas, phosgene and lewisite, as well as for mustard disposal. Part of the old site is still kept secure today because the MOD says there are residual chemical risks.
There are local memories of the firing range too. In 2017 the Teesdale Mercury recorded Jenny Braddy remembering the Army taking shots at the abandoned buildings at East Loups after the war. That is a personal recollection rather than an MOD document, but it fits with the official evidence showing that Battle Hill continued to be used as a firing range after the Second World War.
So what does all of that tell us about the tank?
Our theory is that the tank was deliberately brought onto the Battle Hill training area after it was no longer useful and used as a static target. Its position beside a documented firing range, the amount of damage to the wreck and the fact that most of the useful parts have disappeared all fit that explanation.
What we have not found is the one document we would really love to see: an Army or MOD record actually stating that this particular tank was dragged onto Cotherstone Moor and used as a target. Until that turns up, we think it is important to call this the most likely explanation rather than a proven fact.
Battle Hill Ranges Today
Battle Hill is not just part of the history of this walk. The military still use it today.
The range sits immediately south of Cotherstone Moor, with the tank wreck lying out on the moorland to the north. Look at a modern OS map and you can still see Battle Hill Range marked clearly, along with the surrounding danger area. Our route to the tank stays outside that marked range ground.
Battle Hill forms part of the wider Catterick Training Area, and it is still used for live military training. The Ministry of Defence says the ranges are used for rifle and machine-gun training, including night firing, along with dry training, battle simulation and the use of pyrotechnics.
So depending on when you visit, you may hear firing carrying across the moor. The MOD publishes current firing times for Battle Hill, but the important thing when you are actually there is what you can see on the ground. Red flags during the day or red lamps at night mean live firing is taking place and the range must not be entered, regardless of what a timetable says.
Public rights of way do cross parts of the Battle Hill training area, and they can be used when access is open and the range is not active. If red flags are flying, red lamps are showing or range staff have closed the route, do not enter or continue into the danger area. When the range is open, keep to the public right of way and do not wander onto the surrounding military ground.
There is one other thing worth remembering on the ground with this much military history. If you ever come across ammunition, fragments or anything that looks like military debris, leave it exactly where it is and do not touch it. The MOD warns that old debris can still be dangerous.
It does make the tank wreck feel even more unusual. You are standing beside the remains of an old armoured vehicle that we believe was brought here and used as a target, while just across the moor Battle Hill is still being used for military training today.
Important: You do not need to enter Battle Hill Range to reach the Cotherstone Moor tank wreck. Stay outside the military boundary, obey all warning signs and never enter the danger area when red flags or red lights are displayed.
The Cotherstone Cold War Nuclear Monitoring Post
There is another piece of military history almost underneath your feet before you even start the walk. Very close to the gravel pull-in on Moor Road once stood the Cotherstone Royal Observer Corps underground monitoring post, the sort of small underground structure often referred to as a nuclear bunker. It opened in 1965 during the Cold War and remained operational until 1991. The recorded position is only a few metres from where we start this walk, although the post has since been demolished and there is reportedly nothing left to see above ground.
It was never a bunker for storing nuclear weapons. Its job was far more sobering. If Britain had come under nuclear attack, Royal Observer Corps volunteers would have gone underground to report nuclear explosions and monitor radioactive fallout. Information from posts like Cotherstone would then have been passed through the national warning network so authorities could work out which areas were in danger.
The posts were deliberately small and basic. They were built underground for protection, with instruments used to help work out where a nuclear explosion had taken place, how powerful it was and what radiation levels were like outside. Thankfully, the Cotherstone post was never needed for the job it had been built to do.
What Would Have Been Inside?
It was nothing like the large bunkers you see in films. A typical Royal Observer Corps post had one small underground monitoring room for a crew of three, reached by climbing down a vertical shaft.
Inside there would usually have been bunk beds, a desk and chairs, storage cupboards, batteries, communications equipment and the specialist instruments needed to monitor a nuclear attack and radioactive fallout. There was no proper bathroom or shower. A small separate compartment held an Elsan chemical toilet, while drinking water was stored in containers rather than supplied by running water.
The crew also had emergency food, basic cooking equipment and somewhere to sleep, as they could potentially have been expected to remain underground for days after an attack. Ventilation was basic too, with a manually operated system helping move air through the post.
We have not found a surviving inventory showing exactly what was inside the Cotherstone post itself, so we cannot say which individual pieces of equipment were sitting there. But as one of the standard Royal Observer Corps underground monitoring posts, it gives a good idea of just how cramped and basic life down there would have been.
It is strange to think that where we now pull in to start a quiet walk across Cotherstone Moor, three observers could once have been expected to disappear underground and monitor the aftermath of a nuclear attack.
RAF Bowes Moor – The Second World War Chemical Weapons Depot
Just over two miles south of the Cotherstone Moor tank wreck is RAF Bowes Moor, and once you know what was happening here during the Second World War, the amount of military history packed into this little area starts to become quite remarkable.
Despite the RAF name, Bowes Moor was not an airfield in the normal sense. There was no runway with aircraft taking off and landing. It was a huge RAF ammunition and chemical weapons storage depot, run by No. 81 Maintenance Unit, which formed at Bowes Moor on 8 December 1941 and remained here until 20 October 1947.
The location made sense for something that needed to be kept well away from towns. Bowes Moor was remote, high on the moor between Bowes and Cotherstone, but it could still be supplied by rail. The RAF Historical Society records that the site was chosen as a dedicated depot where chemical weapons could be kept away from conventional ammunition stores.
And this was not a small collection of sheds. RAF Bowes Moor covered around 564 acres, with around 17,000 tonnes of chemical agent stored on the site. Among the weapons kept here were those containing mustard gas, phosgene and lewisite. Those figures come from information attributed to the Ministry of Defence during its later investigation of former chemical weapons sites.
Some of the early storage sounds almost unbelievable now. Bombs were kept in wooden huts and in open areas under tarpaulins. Local sheep were still grazing across the moor and began eating the covers. More seriously, some managed to puncture the thin casings of 65 lb chemical bombs, with fatal results for the sheep. Sheep-proof fencing and gates were added, and the depot was later rebuilt and extended with gas-proof air-raid shelters for the people working there.
By the end of the war the problem had changed from storing these weapons to getting rid of them. Mustard gas was also disposed of at Bowes Moor, including by burning, and that left a legacy in the ground long after No. 81 Maintenance Unit had gone. The Ministry of Defence later listed Bowes Moor as both a storage site for mustard, phosgene and lewisite and a mustard disposal site.
It is easy to drive past today and see nothing more than rough fields, tracks and odd concrete remains. Knowing that this same moor once held thousands of tonnes of chemical weapons gives the landscape a completely different feel.
What Is Left at RAF Bowes Moor Today?
From above, the scale of RAF Bowes Moor is still surprisingly easy to pick out. Old tracks run across the former depot, while rows of storage areas, hardstandings and surviving structures still mark out parts of the wartime site.
Some of it is very much not abandoned, though. A Ministry of Defence review describes the remaining secure holding as rough grassland containing numerous tracks and storage units in various states of repair. Part of it is still used for the temporary storage of fuels and flammable materials and remains a secure Defence site.
This is also why RAF Bowes Moor should not be treated like somewhere to go exploring. It is not the same open-access ground as Cotherstone Moor around the tank wreck. The MOD says there is no general public access to the secure area because of public safety, defence security and residual chemical risks, although an existing public right of way crossing the site is unaffected.
You will also see warning signs beside the road around the former RAF Bowes Moor site, warning that the ground may contain unexploded ordnance and toxic material.
Those signs are not just leftovers from decades ago. Explosive ordnance disposal work at Bowes Moor continued long after the war, and the site was later included in the MOD's Project Cleansweep, which investigated former British chemical weapons sites and the contamination left behind.
So if you pass RAF Bowes Moor, you can still get a sense of the old depot from the roadside and from legal public routes, but do not wander into the storage site, cross fences or gates, or pick anything up.
It is quite something to think that within little more than two miles of the tank wreck you have Battle Hill military range, a Second World War tank, the former RAF Bowes Moor chemical weapons depot and a Cold War nuclear monitoring post. What looks like a fairly empty stretch of Teesdale moorland has had a lot going on behind the scenes.
Safety and Route Information
This guide is based on our own visits and research, but conditions, access and military activity can change. Cotherstone Moor is rough open moorland with boggy ground, hidden gullies and sections where there is no obvious path, so you need to be comfortable navigating with a map, GPS or hiking app.
Battle Hill is an active military training area nearby. Always check the latest MOD firing information before setting off and obey any signs, red flags, red lights or instructions from range staff on the day. Never enter closed or restricted military ground and do not touch any military debris you find.
The route information on this page is there to help you plan your visit, but you are responsible for your own navigation, decisions and safety while out on the moor.
Explore More Around Cotherstone Moor
If you enjoyed the tank wreck, there is plenty more nearby to explore. Our Cotherstone Moor Circular Walk takes you further across the moor and past more of the old farmsteads, rock art and historic remains scattered across this part of Teesdale.
You can also read more about East Loups Farmstead, one of the abandoned farmsteads that helps tell the story of how people once lived and worked up here, or head into our Teesdale History & Heritage section for more old buildings, ruins, military remains and local stories.
Discover More of Teesdale
Looking for somewhere to eat, somewhere to stay or something happening nearby? Our free Discover Teesdale app brings local places, events and useful visitor information together in one place.
For more walks, waterfalls, reservoirs, history, geology, dark skies and places to explore, head back to our main Discover Teesdale guide.
If you are heading towards town, our Barnard Castle guide has walks, local history, places to visit and our Barnard Castle map all together in one place.